


🧵 Stitch Like a Pro, Repair Like a Boss!
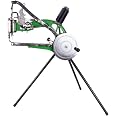
This heavy-duty, handcrafted leather sewing machine features a durable cast iron frame weighing 22 pounds, dual-speed crank operation compatible with cotton and nylon threads, and adjustable needle spacing up to 6mm. Perfect for repairing and crafting shoes, bags, belts, and various leather goods with precision and industrial strength.
| Is Electric | No |
| Power Source | Crank |
| Item Weight | 22 Pounds |
| Item Dimensions D x W x H | 14.4"D x 20.5"W x 5.5"H |
| Material Fabric | Cast Iron |
| Color | Green |
J**J
Truly a Value, but be Prepared........
Please research the Chinese Leather Shoe Patcher (CLSP) on the internet. This is a utilitarian machine, not a retail-grade unit with all sorts of nice plastic covers and precise fit and finished parts. This beast does one thing and that is sew leather and it ain't going to win any beauty contests. So why did I buy it???? Value! A brand name, hand operated leather sewing machine costs around $1,500. WTH?!? I use this for crafts, prototypes, and just for fun, not a commercial shop.When I got mine, I had to unpack it and I suggest having a vacuum close at hand to suck up all the small beads of styrofoam that are attached to the plastic wrap. You have been warned...... You get 3 legs, a center part for the stand and the bolts and washers somewhere in that sea of cheap styrofoam, and one giant bag with the machine in it (which probably has holes in it to allow some more styrofoam beads to get in like mine). When I bolted mine on, I put the two legs under the machine's arm to provide the best stability and the bolt patterns did not line up well, but just use what holes you can until you build your own. Next I pulled the plastic bag off to reveal my new industrial-grease smelling (and covered) machine. Note that the finish is well, crap, there was metal machine shavings, grease covering everything, and sharp edges here and there so be warned. The only assembly of the machine was to put the wheel with the crank on by inserting the arms with the rollers into the grooves and then putting the nut on to hold it all together. You can now spend an hour or so with a roll of paper towels and a cleaner and degrease this thing. You will have a piece of leather in the needle which will show you it did work once in china and some spare parts like extra bobbins in a bag tied to one tensioner so remember to remove that before playing around. NOTE 1, the machine comes with the top thread already threaded in so don't just pull it out until you know how to thread it again. IE, pay attention to how it is threaded when you get it. The bobbin is threaded too, so you you can see how that works as well.Now you may be tempted to use the spool of thread that comes with this machine that is nothing more than plastic fishing line, I advise just tossing that, it is crap and will not sew right. Use your own thread to try this thing out. NOTE 2: you do NOT have to take that screw out of the lower arm to access the bobbin, you just pry up on the plate where the indent is enough to get over that peg you will see and it pivots on that screw to allow you to pull the bobbin up. NOTE 3: getting the bobbin out is a pain unless you have a thin screwdriver, small needle nose pliers, or a magnet from the fridge to pop it out. You have to remove the bobbin and carrier too. Just follow the way it is threaded when you got it or look it up on-line.The finish is rough, real rough. I took a dremel and the felt polishing wheels and some compound and polished the bobbins, carrier, and also the holder for the carrier, but that is up to you. NOTE 4: when you go to use this for the first time, use scrap leather. the presser foot is real sharp and will mar the leather. I used the scrap piece the first time and it left no marks, the next was my thick veg tan and it narled it up good. You will need to add some liquid electrical tape or sand down the teeth on the feet if that is a concern to you. Note 5, I found this things bobbin winder to be a total piece of crap and would wind my first bobbin by hand to ensure some tension on the thread.So after all this, where is the value? Well I saved over $1380.00, spent about 2-3 hours making this thing "less ugly" and less greasy and it will sew over 1/4" of leather with no problem, right out of the box with the factory needle and my T-70 thread. So for me it was a great value. Just manage your expectations, prepare to put in some elbow grease, and have a little patience. Good luck!
L**M
Perfect for the price
I was spoiled at an old job using a very nice machine, but for this price am very happy with this little one. I love how simple it is and you can clearly see how everything works and is therefore easy to pinpoint anything going wrong. Had to lock tight the nut holding the crank shaft on.Still need to build a sturdier base, so haven’t used it for anything super heavy duty, but it’s worked fine for small jobs patching shoes/bags. I think once I get a base built and use it more I’ll get better at sewing straighter lines🤪It arrived well packaged and had a good bit of grease, but rather that than rust. Found a good YouTube video on assembly and figured it out from there. Not difficult if you’re used to using tools and trying to figure out how basic things work. 4 stars not 5 cause I’m spoiled with a nicer machine and this is not a nice machine, but very utilitarian and not thousands of dollars
J**E
Needs some setup tinkering....But works VERY well!!
I read a lot of reviews and watched quite a few videos and decided to take a chance. Glad I did!The machine arrived fairly well packed. There were no bolts and pieces at the bottom of the box but the Styrofoam was broken in places. It was in a plastic bag and very well coated with oil for rust prevention (denatured alcohol cleaned it up nicely).The machine came with ZERO instructions...so You Tube is your friend here.Overall, it looked in good shape. I had heard/seen many videos on the stand/legs being cheap and weak...but I found that lightly hammering the legs to fully fit made it a lot sturdier than what I had seen. I am still planning to make my own mount for it but the legs worked fine initially (Make sure you mount it so the two of the three legs are positions at the needle side of the machine for stability.Initially, I had trouble with the bobbin assembly and found that the timing of my machine was off (again, You Tube to the rescue). After some tweaking and adjusting it sewed right through some pretty heavy double thick leather (see photo).I thought I might upgrade to put a motor on it but have already found that I like the manual control.Overall, I am VERY pleased with what I have for the money and am excited to start some projects. But, it definitely is NOT a take it out of the box and use it immediately kind of machine. Easily worth the money though.
T**B
Getting a good one is luck-of-the-draw
I chose this company because it had the best rating with the most reviewers out of all the other clones. I do believe others have had great success with the machine they received. But judging from the photos, they received a different production run than I did.The first clue was the sample... The sample piece that came with the machine had four stitches in it, but was stopped when the thread was wrapped hopelessly around the bobbin, locking it in place. That took some careful work to remove. The body casting on the machine I received was the same as others had noted - totally acceptable at this price-point. But unlike other machines with smooth steel construction on the rocking arms and shuttle bed, this unit had chrome plating on the arms, shuttle bed, bobbin hatch, and wheel. It looked nice at first glance, but was flaking off in several places leaving nasty sharp edges that cut me several times before I took a wire wheel to the area. The welds were super rough, and the bolt holes that held the shuttle bed to the frame were far enough off alignment that the needle constantly scraped against the side of the opening, fraying the thread. The only way to center the needle in the hole was to use only the first of the three bolts, which worked for the first ten stitches, but would eventually work its way back out of alignment and break the thread.This is so frustrating. I spent three day getting "this close" to having it working. But between the misalignment of the shuttle bed bolts and the sharp chrome flakes, I'm calling it quits. It has SO much potential - there's just too many little things that keep it from being usable.
Trustpilot
2 days ago
3 days ago

![Selric [1500Yards / 36 Colors Available] UV Resistant High Strength Polyester Thread #69 T70 Size 210D/3 for Upholstery, Outdoor Market, Drapery, Beading, Purses, Leather (Black)](https://images-na.ssl-images-amazon.com/images/I/51RGJVBsjJL._AC_UL116_SR116,116_.jpg)