🛡️ Privacy that protects, style that speaks.
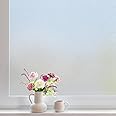
DOWELL Window Privacy Film is a 17.5" x 78.7" frosted, static cling window covering that blocks 99% UVB and 84% UVA rays, reduces glare, and offers reusable, adhesive-free installation. Ideal for bathrooms, home offices, and glass doors, it balances privacy with natural light while enhancing interior aesthetics.


R**D
Just what we needed
Noticeable difference in blocking the sun! I didn’t need it to be a privacy thing… I just wanted the incredible heat coming in to be lessened and this has done the trick. Listened to the other reviews and the instructions and used a LOT of water to get it to work out and it looks great so far!
K**A
Perfect!
This tint took a little practice to get it applied BUT we are so happy with the results.It keeps the sun out and the rooms cooler + you can have all the lights on inside without neighbors seeing in. The windows on our house look AMAZING!10/10 recommend!
F**?
Filtro solar con efecto espejo
Realmente bloquea la visualización desde afuera hacia adentro. Muy buena calidad
L**E
Ok product
Doesnt stick very well around edges but i used double sided tape to fix the edges. Otherwise gets the job done and definitely adds privacy.
L**E
Use window film application solution it sticks better!!!!!
Read for TIPS!!!!But before tips, here’s story time:I had to buy another roll because I was not precise on my measurements and messed up a lot lol. I tried connecting two pieces together since I messed up so many times and had only 2 pieces left. The pieces I tried connecting peeled off. Sooo…this is my second round… with ONE long piece and exact measurements…and look at the results 😍!!!BEWARE:This was a very complicated, frustrating and time consuming project, but if anyone is still willing to do this challenging project, I’ll share some tips.***IMPORTANT***the film is very thick, so if there are parts of the film that sticks out, or doesn’t cover the window all the way because of a measuring mistake… it might fall off.This is a project that can annoy you so bad if you don’t consider these tips, so please consider reading below.TIPS:-first and foremost, make sure your window is washed twice(I washed with warm water and dawn soap). Then scrap off any stubborn specs. The window needs to be completely spotless before applying the film.-measure out your desired shape. If you are trying to apply a film to a square/rectangle window, use acarpenters ruler (it’s shaped like the letter L).I also purchased a steel yard stick since my window is very long. Both can be found at Home Depot/Lowe’s.-measurements need to be 100% accurate and precise. The yard stick and L shaped ruler will help you draw straight lines and exactly 90° angles on all sides(use these for a square or rectangle window).-carefully cut the film along the outline you drew-wipe off any pen marks that was left on your film from outlining. I rubbed the pen marks off with the solution on a paper towel.-peel the film, the part where sticker comes off, that’s the side you’ll stick to the window.-ALSO, please don’t listen to the instructions of just applying water to get it to stick on, purchase a window film application solution(can be found at Home Depot/Lowe’s).-spray your whole window and cover every spot with the solution(leave it wet)-religiously spray the cut piece (the side you just peeled from).-make sure both the window and the film is very wet, this will help it stick to eachother.-stick on the window, line it up, make sure the whole window is covered with film, and make sure there aren’t areas of the film sticking out. If there’s small areas sticking out, tuck it into the window frame.-use an old credit card to get all the solution and bubbles out. Any bubbles, especially on the perimeter of the film, will cause air to come in, causing the film to peel, then falling off the window.-make sure all solution and all bubbles are squeegeed out. I squeegeed for a minute since I doused the whole window and film with the applicator. I got a paper towel to wipe up all the drips from squeegeeing all the solution out.-I stayed in the bathroom to let it dry and checked on it frequent. I didn’t want it to dry if there was any air bubbles between the window and film. You didn’t put all that hard work just for the pretty film to peel off. Just triple check it till it’s dry.and there you go pretty rainbow crystal lights coming through the window 🙂TOOLS:-dawn soap and warm water (pre-wash window)-roll of window film-L shaped ruler (for straight 90° angles)-yard stick(for long lines, if you have long window)-pen (for outlining)-sharp scissors-window film application solution(NEEDED!!)-old credit card (use as a squeegee)-paper towels (wiping up excess solution)-patience and hard workHope this all helps!
P**S
Easy to apply
Easy to use and looks great.
G**N
Perfect
Perfect!
L**M
Came with a crease.
The film is a decent thickness, but not easy for a 73-year old woman to handle. Don't install it on a windy day. Also, I highly recommend using a T-square, which I don't have anymore, to cut a straight, square edge. It looks nice if you can get all the water/air bubbles out. The roll I bought was enough to cover the upper half of a sash window. I recommend overlapping the pieces of film, and then cutting through both of them and removing the excess so that they overlap perfectly, as you would with wallpaper. Luckily, I have fake mullions on the window, so I hid that overlap cut behind a mullion. I deducted two stars because there was a crease in the second piece I cut - it was hidden in the roll until I cut off the first piece. There was not enough film left to avoid having to use the second piece with the visible crease. I wasn't happy about that. Had it been near the outer edge, I could have returned it before cutting the second piece. The bubbles are nearly impossible to remove, or they were for me. I'm not sure I would recommend this, but I'm not taking it down until I see how it works on a sunny day.
Trustpilot
2 months ago
5 days ago